Sunday, November 16, 2014

One Ingredient to Banish Toothache

If right after the sweets, your teeth screams, "It HUUURTS!" What do you do?

I use one simple natural ingredient: Bentonite Clay.

I use Bentonite Clay as face mask

Since I also mix it in with my baking soda toothpaste as a remineralizing and whitening ingredient (you can add Bentonite Clay to my remineralizing toothpaste recipe), I tested it for another remedy- as a natural cure for toothache-and it worked!

I've eaten too much sweets for my own good today, so my tooth ached a bit. 

I just put some Bentonite Clay directly on the ailing (wailing) tooth and let it stay for 10 minutes or more until the pain is gone. 

If the pain returns, I just put some more clay on it and let it stay longer.  Gargle with warm water after.  This clay is safe by the way to eat, although in small amounts. 

I'm so loving these natural solutions that work! 

Here's what I use:
face mask and cures toothache bentonite clay
For Face Mask AND Curing Toothaches!

Ingredient
Bentonite Clay (the amount depends on how much you need for your aching tooth/teeth)

Instructions
1) Put some Bentonite Clay on your painful teeth.
2) Wait for 10 minutes or more until the pain is gone.
3) Gargle with warm water afterwards.

What Witchcraft is This?
Bentonite clay may remineralize teeth, since it is made from calcium.  Its calcium may be helping our teeth remove all that horrible sugar acid stuck on our teeth too, if we have not brushed well, or if our toothpaste does not exactly clean our teeth the way we expect it too. 

If you want to know more why your commercial toothpaste may not be cleaning your teeth well and may even be harming your health, you can read this article of mine. Here's the link.

It also helps to brush first with my homemade remineralizing toothpaste recipe that has antibacterial and natural cleaning ingredients. 

Brush for two minutes (and not more because too long of a brushing might damage your teeth). Gargle with warm water after because warm water washes it faster, although you can use tap water too.

Some Reminders in Using Bentonite Clay
Don't let this clay come in contact with metal things because it will decrease its effectiveness. This clay will not stain your teeth, but will muddy your white clothes, so be careful if in white or other light colored clothing.

Toothaches are no fun, but having a simple, one-ingredient natural solution is fun! 

What natural toothache solutions have you tried?


Saturday, November 8, 2014

I'm Still Alive!

Sorry, I've been too busy lately. It hurts me to not blog anymore about the things I love, i.e. finding ways to make natural living more practical and fun for me and my family, and motivating others to follow this way of life.

Nevertheless, I am on still on this crunchy path to being a mother who does not have to buy artificial chemicals for many of our everyday beauty, hygiene, and cleaning needs. I'm proud that I have maintained the good habit of using these recipes on my blog, depending on the hecticness of my schedule.   

There are a lot of setbacks in turning the leaf of natural existence. Costs, time, research, people who do not believe in you and would rather believe in commercial products that have questionable ingredients and so on.

But I will not be daunted.

I will persevere in my own ways.

My six-year-old daughter Zoe is the biggest fan of my homemade products and she uplifts me so much with her support. We both use my baking soda toothpaste recipe by the way. Check out her beautiful white teeth, thanks to baking soda.

She is my inspiration, and I hope that Achilles, my three-year-old son, will soon get into my bandwagon too when he's old enough. 

My husband supports me as well, but he's hesitant in using my recipes. That's okay. I never force anything on anyone. I will just keep on doing what makes me happy :)

I love this. This feeling of freedom from buying many things.
This feeling of empowerment for knowing that food and natural products are my beauty and personal cleaning products. 

That feeling that I nourish my soul too for being more connected with nature.

This is all I have for now :) See you around! 

Thursday, June 26, 2014

Earthquake Safety and Survival Tips: Preparing Our Homes, Ourselves, and Our Kids for Earthquakes

The ground shakes suddenly and violently. What should you do when you're with your kids? What should you teach your kids to do during earthquakes?

Also, what should you when you're at home? 

In the workplace? 

School and other buildings? 

Car? 

Beach? 

There are many places where you might be, and some actions and responses are more appropriate than others, in order to help reduce the possibilities of being injured, and, more importantly, to help save your life and your family's lives. 

Philippine Earthquake, June 25, 2014: 
No to Extinction

Several parts in the Philippines just experienced an earthquake last night. See this news article for an update

During this time, my husband and I were watching Transformers: Age of Extinction in an IMAX theater. I know, what an ill-timed title. I don't plan to get extinct yet. 

At first, I thought someone kicked the back of my seat. When the shaking movement continued, I turned around slowly to my right to look with scorn at the offender, only to see all seats and the people in them swaying sideways. There's an earthquake!

I clutched my husband' arm and looked at him and around us. I didn't even have to take off that dark 3D glasses to know that my husband looked calm in his. I could hear him saying: "Relax lang Mahal (Relax my love)."

I looked around us. I could see people strained in their seats, clenching the arms of their chairs, ready for flight. They looked around too. In their 3D glasses. It seemed like we're watching a disaster movie with us in it.

The shaking strengthened for a few seconds, stayed strong for several seconds, then weakened. 

Some left the movie after the earthquake. The majority did not want to let their tickets go to waste. Us included. (Sheepish look). Not because our tickets are more important than our lives, but because we felt the worst was over. (Indignant, defensive look).

After the earthquake, I called my mother where my kids were at the time. They did not even notice the quake at the first floor. My brother felt his chair and things shaking in the second floor though.

So there, when you've just experienced an earthquake, you're reminded that you're a mere crushable mortal and that you need to prepare for future disasters. 

One of my preparations is to write this article for my kids and to share accumulated information from various sources, which are credible for me, like emergency response, health care, and other government organizations, with all of you.

Earthquake Safety and Survival Tips

Earthquake preparedness is a mindset. It's knowing what to do when an earthquake strikes because you've practiced it before. It's staying calm because you know your kids also know what to do, even when you're not there for and with them.

Explaining the nature, causes, and effects of disasters is hard to do with young kids, but it is essential because it will help them understand why they should take disaster preparedness seriously. 

The links in this article will bring you to the sources I used. These sources also offer additional information at times, although many of them give similar knowledge that I've merged into this article. I am no expert, but I am a civilian who is willing to do research and to share these results to all, in order to raise our preparedness.

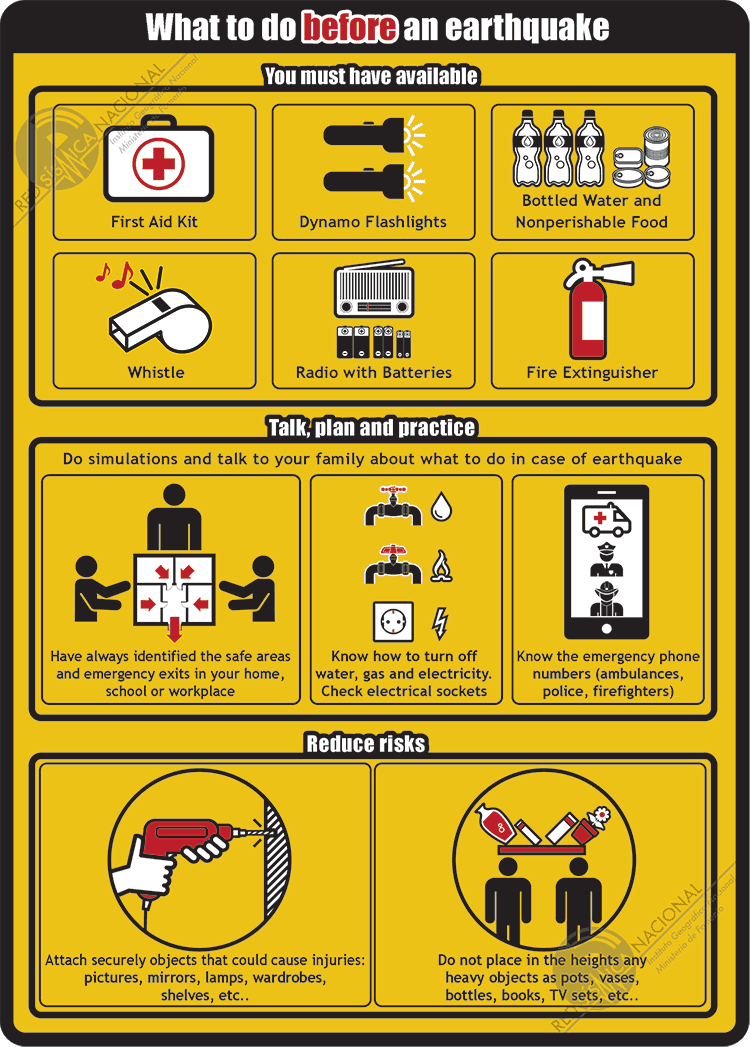
BEFORE AN EARTHQUAKE OCCURS

At Home: Determining Potential Hazards and Increasing the Earthquake-Proof Quality of Your Homes

1. Prepare not just your family, but also your home. Make sure that heavy, bulky appliances and furniture, like refrigerators and cabinets, are attached or strapped to the walls. 

2. Store heavy items and breakables at lower shelves.

3. Put only light art and other materials on your walls, so that if they fall during earthquakes, they will not greatly harm those they fall on to.

4. Repair parts of the house that are infested with termites.

5. If possible, light materials should make up the roof and ceiling. 

6. Prepare a Disaster Supplies Kit. The kit should be easily accessible. If your house has several floors, prepare a kit for every floor. Make sure that everyone, kids and helpers included, know where the kit is. The Disaster Supplies Kit should include these basics, though you can add more, depending on your personal and medical needs:

  • First aid kit
  • Flashlight and extra batteries
  • Cash and credit/debit cards
  • IDs
  • Whistle
  • Waterproof match or match in waterproof containers, or lighter
  • Map of the community area that show the locations of hospitals, fire station, police station, and local government centers.
  • Important phone numbers of loved ones, police station, fire station, local government, and medical centers.
  • First-aid assistance manual.
  • Remember to consider the needs of very young and older family members, such as infants and elderly or disabled persons.
  • For babies: Formula, diapers, bottles, powdered milk, medications.
  • For adults: Heart and high blood pressure medication, insulin, prescription drugs, denture needs, contact lenses and supplies, extra eyeglasses, and hearing aid batteries.
  • Here's the link for a more complete list of emergency supplies for emergency preparedness.

7. Know how to render first-aid assistance to family members. Here are some links for providing first-aid assistance. This link is from Mayo Clinic and this link is from Red Cross.

8. Know where the main switch of electricity is located. 

9. Gather and store important documents in a fire-proof safe. Here's a link for some documents we should store.

10. Here's a link for emergency water and food issues.

11. For more information on inspecting your houses for home hazards, this is the link from the U.S. Centers for Disease Control and Prevention (CDC).

Before earthquake tips habits checklist


At School and Workplace: The Role of Disaster Preparedness Plans and Disaster Drills

1. Oblige the school administration to set up prevention and awareness dissemination programs like earthquake drills to minimize danger and casualty.

2. If your company does not have any disaster preparedness plan and disaster drills, make a formal request by letter to decrease danger and casualty to everyone inside and outside the premises, and damage to company property.

3. The building's evacuation plan should be visible to all at every floor. Mark where first aid kits, fire extinguishers, and emergency food and water are located. See below for an example of an evacuation plan. Take time to look at the evacuation plans of every building you visit or work in.


evacuation map with images of fire extinguisher first aid
Source: Steamwire.com

Note on sources of information: Many statements are copied verbatim from the Philippine Red Cross.

WHILE AN EARTHQUAKE IS HAPPENING

1. Don’t panic. Don’t even run outside if you are inside a building and the shaking has already started because things might fall on you and you'll get hurt even more. At this time, shield yourself from falling debris by ducking under a table, or other similar furniture and fixtures. Move away from glass windows. Here's the drop, cover, hold on strategy that is helpful to remember and to do during earthquakes. 

However, some question this strategy because it cannot protect oneself during strong earthquakes. Tables can be crushed, as well as those underneath it. If possible, cover your head as you try to make way outside the building. 


drop cover hold strategy earthquake tip

Source: U.S. Centers for Disease Control and Prevention

2. Once the shaking has stopped, access your Disaster Supplies kit and find a safe place to stay.


get a kit make a plan be informed
Source: Red Cross

3. If you find yourself outside a building, calmly find a safe spot where you are far from electric posts, trees and collapsing walls. 

4. If you are near tall buildings, windows, building surfaces and architectural details are frequently the first parts of buildings to collapse in a quake.  Get away from this danger zone when shaking starts. Take refuge in a safe building or move to an open area.

5. Don’t light anything when a gas tank is leaking.

6. Take the stairs instead of using the elevator. Sudden loss of electricity might get you stuck in an elevator.

7. When inside a car, avoid passing under flyovers and bridges. Park the car away from structures that could fall down, and remain inside the car until help arrives.

8. When you are on a beach, run at once to a high place, in case the earthquake causes a tsunami. 

9. When inside a crowded building like a movie house, don’t shove and push your way outside. Calm yourself and make sure to avoid structures that may topple.

10. When in a mountainous area or near unstable slopes and cliffs, be aware of falling rocks and debris.


earthquake tips during an earthquake stay calm

Source: Malaga Weather

Note on sources of information: Many statements are copied verbatim from the Philippine Red Cross.

AFTER AN EARTHQUAKE

1. Check yourself and your companions if someone is hurt and/or unconscious, and then perform first aid when needed. Again, here are some links for providing first-aid assistance. This link is from Mayo Clinic and this link is from Red Cross.

2. Inspect sources of gas and electricity. Make sure to repair them as soon as possible when damaged.

3. Wear shoes and boots, or anything that would protect your feet from broken pieces of glass that may cause wounds.

4. Check electric posts. Report to the authority if you see fallen or broken posts.

5. Avoid staying by the seashore. Tsunami may strike anytime after earthquake.

6. Use your cellular phone only for emergency to preserve batteries.

7. Prepare yourself for aftershocks. Avoid dangerous infrastructures because these may topple and collapse anytime.

8. Follow the emergency plan of your local government. If you are not aware of any, it's time to familiarize yourself on it.

9. If you wish to vacate your area, leave a note that would specify your destination. Bring tools for emergency such as flashlight, candle, clothes, blanket, food and water.

10. Turn off the main switch of your electricity to avoid fires when there are aftershocks.

11. Listen to the radio for any updates regarding the disaster.


earthquake tips stay calm


Note on sources of information: Many statements are copied verbatim from the Philippine Red Cross.

Disaster Preparedness and Saving Lives

We have to know how to prepare ourselves and our kids, mentally, physically, emotionally, and psychologically (and spiritually to those who believe in God or spiritual entities), so that when disaster occurs, instead of panicking, we have the presence of mind to do what we have to do before, during, and after earthquakes.

Let's prepare our disaster kits and evacuation plans now and make sure our communities are also disaster-ready.

We can't predict or stop disasters, but we can do something to stop ignorance on disaster preparedness.

What other tips and habits can you recommend for disaster preparedness? Do you already have a disaster preparedness plan and kit at home? Have you conducted your own earthquake and other disaster drills at home with your kids? 

Tuesday, June 24, 2014

Habits and Exercises to Ease or Prevent Carpal Tunnel Syndrome (CTS)

Carpal Tunnel Syndrome  showing hand parts that get affected


Fighting Against the Future of Failing Fingers

Many of us do it all the time- overworking our fingers, hands, and wrists to the point that we have "invented" a new illness among us frequent computer and other communication devices users. I'm referring to Carpal Tunnel Syndrome (CTS). 

CTS is a "personal illness categorized under cumulative trauma disorder or repetitive motion trauma," and it is the "fastest growing occupational illness in the United States."

Source: Medicine.net

I'm in the Philippines, and with my country having the reputation of being one of the heaviest texters in the world (heaviest texter means we send the most text messages each day in the world; yeah, well, we like connecting to our loved ones, even when they're in the same house, or we're going to meet them the next day), I won't be surprised that, aside from being the "text capital of the world," we'll have pretty soon some of the most cases of young people with Carpal Tunnel Syndrome. Not a good future world record at all.

Then again, with the widespread use of tabs, smartphones, and laptops, among many other devices where we use our hands, in many developed and developing countries, Carpal Tunnel Syndrome might be one of the next most extensive lifestyle diseases of the modern world. Again, not also a good future world record. 

Prevalence of CTS in Certain Industries

Carpal Tunnel Syndrome has been around for some time, wherein most of those who develop it are in the mail service, health care, construction, assembly line, and fabrication industries

Before, CTS afflicts mainly the manual labor industry, but now, it is spreading in the computer industry.

Many of us use our keyboards daily, whether for work, gaming, or other purposes, and we're at also at risk for developing CTS, though lifestyle, and other biological and environmental factors further increase CTS risks.

Symptoms of CTS: Weak in the Hands

Some of the common symptoms of Carpal Tunnel Syndrome are "burning, prickling, and tingling within the wrist or first three fingers and thumb." Other symptoms are weakness in the hand and the tendency to drop objects because of numbness or weakness in pinching/grasping things.

Natural Ways to Prevent CTS

We can make changes in how we use our computer/devices to naturally prevent CTS. Let's make these changes our new habits from now on.

    1. Shaking or stretching the limbs.
    2. Leaning back in the chair.
    3. Squeezing the shoulder blades together.
    4. Taking deep breaths.
  • Practice hand exercises with every break, which are discussed below with pictures.
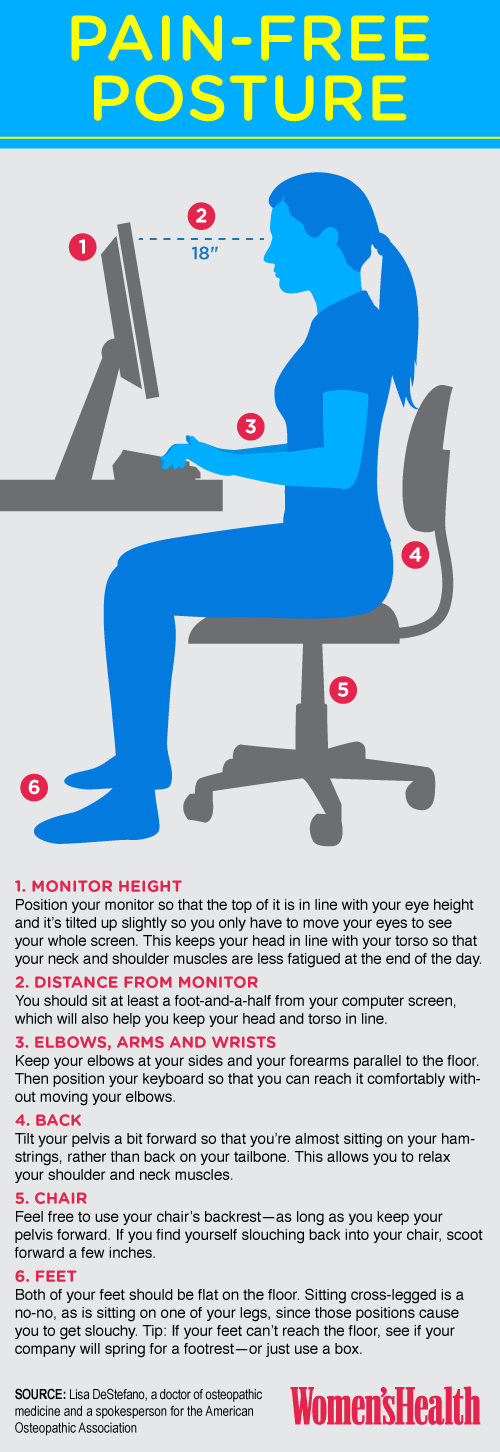
  • Observe good posture while sitting. I know some would say that good posture is natural, but bad habits can make us forget what good posture is. Here are some reminders on what "good posture" means:
    1. You should sit with your spine at the back of your chair with your shoulders relaxed.
    2. You should rest your elbows at the sides of your body when reading or watching something and with your wrists straight on your sides or lap.
    3. Your feet should be firmly on the floor or footrest.
    4. When typing, your typing materials should be at eye level, to prevent the neck from bending down when working.
    5. You should keep your neck flexible and the head upright to help maintain good circulation and nerve function for arms and hands.
Are You Sitting and Typing Wrong?

Here are some images to help us imagine how to sit and type properly. Basically, how to work (or play games, socialize et al.) without ruining our precious hands and backs (even our eyes and necks).

When Working on a Laptop
How to sit right in front of a laptop to avoid carpal tunnel syndrome and for proper posture
Source: Daeco

When Working in Front of Computers


How to sit right in front of a computer  to avoid carpal tunnel syndrome and for proper posture

You can print these images and put them in front of your PCs or where you usually use your devices. They are great reminders on how to sit and type right.

Treatment and Prevention Exercises for CTS

These exercises are from different health departments. All links lead to these websites where they came from. These exercises can prevent Carpal Tunnel Syndrome , but of course, not 100%, since many other factors can lead to it. At least, there's something we can do to continue our work and pleasures without increasing CTS risks.

These exercises can also treat Carpal Tunnel Syndrome  because they can treat symptoms and reduce the further deterioration of our hands.

Still, do remember that you must consult your physician for further advice.

Some Carpal Tunnel Syndrome Exercises

Carpal Tunnel Syndrome Exercises

The following are exercises copied verbatim from the University of Maryland Medical Center (UMMC).

Wrist Exercises


Exercise 1

    1. Make a loose right fist, palm up, and use your left hand to press gently down against the clenched hand.
    2. Resist the force with the closed right hand for 5 seconds. Be sure to keep your wrist straight.
    3. Turn your right fist palm down, and press the knuckles against the left open palm for 5 seconds.
    4. Finally, turn your right palm so the thumb-side of the fist is up, and press down again for 5 seconds.
    5. Repeat with your left hand.
Exercise 2
    1. Hold one hand straight up shoulder-high with your fingers together and palm facing outward. (The position looks like a shoulder-high salute.)
    2. With the other hand, bend the hand you are exercising backward with the fingers still held together and hold for 5 seconds.
    3. Spread your fingers and thumb open while your hand is still bent back and hold for 5 seconds.
    4. Repeat five times with each hand.
Exercise 3 (Wrist Circle)
    1. Hold your second and third fingers up, and close the others.
    2. Draw five clockwise circles in the air with the two fingertips.
    3. Draw five more counterclockwise circles.
    4. Repeat with your other hand.
Fingers and Hand Exercises

Exercise 1
    1. Clench the fingers of one hand into a tight fist.
    2. Release, fanning out your fingers.
    3. Do this five times. Repeat with the other hand.
Exercise 2
    1. To exercise your thumb, bend it against the palm beneath the little finger, and hold for 5 seconds.
    2. Spread the fingers apart, palm up, and hold for 5 seconds.
    3. Repeat five to 10 times with each hand.
Exercise 3
    1. Gently pull your thumb out and back and hold for 5 seconds.
    2. Repeat five to 10 times with each hand.
No Time for Hand Exercises?

And if you think these exercises are too much of a trouble, think again. Perhaps this image of standard surgery procedures for treating Carpal Tunnel Syndrome will change your mind. Ouch! I can almost feel that knife slicing into my wrist... 

Surgery for Carpal Tunnel Syndrome Patients Prevent through Right Exercises

Make Time and Save Your Hands

These exercises and changes in habits are simple and easy to do. They just need to be done and we're already doing something actively to prevent Carpal Tunnel Syndrome.

Have you felt any numbness in your hands lately? What do you when your hands feel tired?


Thursday, June 19, 2014

Beautiful Desserts: Eye Candy and Healthy


Tired of baking desserts? Or do you simply want to try something fresh? These ones you only have to carve.

Beautiful, body-nourishing, and biodegradable, no-wash dishes. 

What more can you ask for?

Fruits Galore in Beautiful Watermelon Dish Tasty Fresh and Healthy
Mouth-watering. Photo not mine though :)

Thanks to Coconut Mama for sharing this (including the photo).

And another one. Berry appetizing.

Simple, healthy, no wash after desserts


Any fresh ideas for desserts you'd like to share? 

Friday, January 10, 2014

Knocking Out the Harsh Season with Four Tested Natural Remedies to Colds and Cough


Snow Storm winter cold season tested natural homemade remedies to colds and cough
Common Colds, Cough and You: Who Gets Knocked Down?
Don't let the cold season beat you out of your senses (pun intended) because of colds and cough. Knock them out, not the other way around.

The cold season in some parts of the world right now are beating people relentlessly. On my end, it's a bit cold too, (though it's definitely not snowing in my tropical country, the Philippines) and I'm down with colds and cough myself. 

However, through several tested natural remedies, I've reduced the time that I usually have these horrible illnesses and stopped them from escalating to fever.

Why combine remedies to colds and cough, some of you ask? Usually these sicknesses go together, and some of these tested remedies can beat, not just colds, but cough too. 

These are "tested" remedies because I've tried them on various occasions on my kids and myself and they have helped ease the symptoms and clear these illnesses faster.

Tested Natural Remedies to Colds and Cough


The following are four tested natural remedies to colds and cough. Go for these natural and practical solutions, but make sure you're not allergic to any of these ingredients though. 


The Lime that Killed the Colds with Sour-Sweetness

The first natural remedy is quite popular, simple, and easy to make. It is even seen as a pre-colds remedy, or that time when you feel that your throat is itching before the full-blown colds sets in. As a pre-colds remedy, you can take it to help prevent colds. 

The usual online recipe uses lemon. Lemon, however, is quite expensive in the Philippines, but calamansi or lime is much more affordable here. My sense of practicality demands changes in the usual apple cider vinegar-honey-lemon remedy to colds.

Ingredients 


1 tablespoon of apple cider vinegar (ACV)
1 tablespoon of raw honey
1 tablespoon of lime (or lemon if you have that instead)

One Simple Procedure


Mix them up and drink them two to three times a day. The taste is alright. Honey masks the vinegar's sour taste. 

Effects

  1. Relieves dryness and itchiness of throat for dry cough.
  2. Helps phlegm to be coughed out easily after a day or two for those with phlegm.
Lime's Health Benefits

The Super Fruit that Stole the Soul of Colds 

The second natural remedy is eating a cup of fresh guava or drinking a glass of pure guava juice twice a day. 

Effects

  1. I noticed that guava fruit/juice heals my colds and cough faster than other fruits rich in vitamin C. Though of course, every case might be different. 
  2. I ended my kids' colds in a day too several times because they drank two glasses of guava juice the day before, while also taking the lime remedy.
Guava's Health Benefits

Green Tea's Gingered Solution to Colds

The third natural remedy is green tea with a teaspoon of ginger juice. You can juice fresh ginger or boil ginger and add a green tea bag to your cup of ginger tea. Double greatness for a gingered approach to beating colds and cough. The taste is quite zingy-spicy, and to some, bitter. You can add a teaspoon of honey for sweetness and to triple its nutritional goodness.The sourness is quite good for itchy throat though.

Effects

  1. Relieves itchy throat.
  2. Loosens and moves mucus.
benefits of ginger flu and colds treatment and prevention
The Benefits of Ginger, One of Which is Cold and Flu Prevention and Treatment

Dr. Oz Natural, Homemade Cough Syrup 

The fourth natural remedy is from Dr. Oz. It is a natural homemade cough syrup. I tried this and it helped ease the itchiness of my throat because of phlegmatic cough.

Ingredients

1 tablespoon ACV
1 tablespoon honey
1/4 teaspoon ginger
1/4 teaspoon cayenne pepper

Two Simple Steps


Mix ingredients in 2 tablespoons of water. Gargle before swallowing.

Effects

  1. Relieves itchy throat.
  2. Loosens and moves then removes mucus.
Cayenne Pepper's Health Benefits

How Do These Remedies Achieve Their Benefits?

Cranks up the immune system. ACVhoney, ginger, and green tea, and lime, based on anecdotal evidence and several studies (green tea), can boost the immune system. In turn, they promote vitality and energy that can help you defeat these viruses plaguing your body. 

Vitamin C sources. One of the reasons that ACV, guavahoney, and lime can improve the immune system is that they are good sources of Vitamin C. Some studies showed that eating/drinking foods and liquids that are rich with Vitamin C can help decrease the duration and severity of cold symptoms.

Anti-viral and antibacterial. ACV, honeygingergreen tea, and lime, based on anecdotal evidence and some studies (green tea), have anti-viral and antibacterial properties. These properties make them potent against colds and cough.

Mucus buster. Cayenne pepper can break up and move mucus.

Knock-out Win against Colds and Cough

These four natural remedies to colds and cough are only some of the traditional cures to these illnesses. You can check out and try more colds-and-cough-busting recipes from other sites, such as DIY Natural, one of my favorite natural health websites. 

The important thing is that you are now aware that you are not limited to over-the-counter colds and cough syrups/tablets anymore for you and your family. 

These natural remedies are kid-friendly too, except the one with cayenne, because my kids dislike spicy foods. 

Nature offers us awesome fighting gloves through homemade natural medicine that can beat colds and cough naturally and practically. 

Arm yourself now. And give those viruses the knockout they deserve.


Monday, January 6, 2014

Nightmare at Epilin Street: Homemade, Natural Remedies to Horrible Skin Allergy

Red, itchy blisters that ache to be scratched until they are sore and pus-filled. Anxiety attack from the sight of them and the horrible itchy feeling.

Eew, what a nightmare!

But they're all too real for me before when I had them all over my underarms and legs a few weeks ago. (No, I will not post pictures at all!). 

But why you say? It's because I tried this Epilin hair-removing wax, which seemed natural enough for me because it has very few natural ingredients, and then around 24 hours later, I got severe allergic reaction to it. My skin developed red, itchy red rashes.

I was tempted to go to a dermatologist but stopped myself. 

I know it's wrong (at least for others, but not so much to me anymore) to not consult a medical practitioner on these matters. But since I've gone DIY and natural living, I've realized that nature offers the best medicine already and people in my circles have helpful advices and insights on self-healing through nutrition and natural homemade remedies. 

Also, I didn't want to put ointments with chemicals I am not familiar with anymore on my skin, which I am sure a dermatologist will recommend. After going no 'poo, it seemed to me that I'd be taking a two steps back if I put a whole new set of expensive, manufactured products on my skin.

Plus, derma products are stupendously expensive. Not to mention derma fees. Whew. Just thinking about the money that flows out of my palms make these palms sweat. In other words, I don't find it practical to fully rely on dermatologists and their products for my skin needs.

So, leaving these usual options behind, I had to rely on two doctors: Nature and my immune system. Natural remedies summoned me, and running to them I did!

Homemade Remedies to Skin Allergy

Ingredients

1) Virgin Coconut Oil
2) Baking soda
3) Oatmeal and honey
4) Garlic
5) Tea Tree Castile Soap
6) Boiled water, still warm

And what are these ingredients for?


1) Virgin Coconut Oil- Antibacterial, anti-inflammatory, anti-itch. It soothes the burning feeling of scratching allergies. It also heals the rashes and renews the skin, as least in my experience.
2) Baking soda- Anti-itch and for giving that beautiful relief to soreness.
3) Oatmeal and honey- Antibacterial, anti-inflammatory, anti-itch.
4) Garlic- Antibacterial for any infection that I have enhanced because of my scratching.
5) Tea Tree Castile Soap- Antibacterial.
6) Boiled water, still warm- For washing and making baking soda paste.

Self-treatment Procedures


1) Don't panic and have the ingredients ready. Be well-armed with these supplies.

2) Wash the allergic skin portions with Castile soap with hands only and using warm water. Warm water feels good and removes wax residue, if still present. Pat dry afterwards, not scrub, with towel. Resist the urge to rub or scratch.

3) Put baking soda paste on allergic skin. Just mix baking soda powder with distilled or filtered water or boiled water. Let it stay for ten minutes. This will sting. You can also try cooking oatmeal and adding honey, and then put this on your skin for ten minutes too. I tried this after using the baking soda paste, but only once though.

4) Wash again with warm water. Pat dry. Put generous VCO on the affected areas. Let the skin absorb it for 10 minutes before even considering scratching it again. VCO can relieve itching and burning and will heal the allergy slowly.

5) Mince half a teaspoon of garlic and drink it up with water once a day for its antibacterial properties that can help heal the itchiness and infection from within. Do this until the itchiness goes away and the rashes are completely dry.

Treatment Time


For the rashes to dry using this treatment procedure, it took me four days. Just continue washing with castile soap and putting VCO until the itchiness and redness of rashes are completely gone. This phase took six days. 

Commercial products can promise instant or faster results, but they are loaded with many chemicals you may not want on your skin. I chose natural over manufactured treatment and everything is find on my end.

As for the black scars from the skin rashes, oh the scars... You will know why you should not scratch these rashes hard and long because of these horrible dark scars...

I am using Dr. Wood's exfoliating soap and vitamin E soap for now to renew my skin. Some people say raw 100% cocoa butter will help decrease the darkness of the scars, so I will buy and use that when the budget permits.

The Nightmare Ends

I'm not a doctor but I healed myself. 

No, nature healed me and helped me heal myself.

The nightmare at Epilin Street is all over now. 

Homemade remedies to skin allergy worked for me. You can try it, but make sure you are not allergic to these materials that I used. Otherwise, the nightmare will be extended.

Fear not. Nature has multiple answers. And the Internet offers many solutions. Just make sure to find reliable websites and always test something on a small part of your skin to check for allergic reactions (ugh, that allergic word again).

Nature and the human immune system are awesome healing partners. 

Let them end even the worst skin nightmares for you.

What are some products that gave you skin allergies? What natural remedies did you try that worked and did not work?